To create a new form:
- Under Components, go to Forms.
- Click +New.
Form types

- Campaign Form: Triggers a campaign on submission. Campaign forms have fewer directly associated form submit actions (which happen after a contact submits a form.) Most actions trigger as part of the campaign the form triggers.
- Standalone Form: The more commonly used form type, used for more generic data collection. Use form submit actions to add contacts to a segment and use that segment as the contact source for a campaign, to trigger a campaign based on Standalone Form submissions.
General options

- Category: You can organize your forms based on their goals, campaigns, etc. For more information, see Global Categories.
- Publish options: The Yes/No toggle is the fastest way to publish or unpublish a form. Unpublished forms won’t be visible on pages you’ve added the form to using JavaScript. If you used the manual copy and pasted the HTML code onto your page, the form will still be visible but not submittable. Contacts will see an error message if they try to submit the form.
- Disable search indexing: Select Yes to prevent search engines from finding and displaying the form in search results for related topics.
- Kiosk Mode: Select Yes to turn off tracking, and prevent MassiveHand Campaign Works™ from generating new cookies or attaching the IP address to the contact record. This may also be referred to as data entry mode. Use this for instances where several contacts may enter their information using the same device, such as a conference. Kiosk mode prevents the activity on the device from being tied to one contact.
- Render Style: When you select Yes, the form displays on your page or application with the styling from either the selected theme the Attributes tab of a field editor. When set to No, the form adopts the CSS of your page or application.
- Theme: The selected theme dictates the styling of your form when it’s added to an external page or application, if Render Style is set to Yes.NoteNot all themes include form styling. Check the Features column on your Themes page (in Settings) to see which available themes include CSS for forms.
Form details

- Name: Title your form, including any terms you may want to use to search for the form.
- Description: Add a description, so other users can see what the goal of the form is. It may help to include information like the creation date and any pages where the form appears.
- Successful Submit Action: Options include
- Remain at form: nothing appears to happen
- Redirect URL: directs the contact to another page, such as a thank you page, after submission
- Display message: shows a message over the form once the contact has submitted the form).
- Redirect URL/Message: If you decide to use the Redirect URL successful submit action, paste the URL where you’d like to direct submitters. If you use Display message, enter the message to display.
Form fields

Field types
Choosing the proper field type helps MassiveHand Campaign Works™ users gather data appropriately on forms, and can optimize the end-user’s experience of completing the form. On some devices, certain form fields may display differently and the wrong field type may result in a more difficult submission, resulting in lost conversions.
To add a new field:
- Click the Add a new field menu.
- Select the field type you’d like to add. The available field types are listed below.
- Enter more information about the field. For more information, refer Field editor.
- CAPTCHA: A basic form of spam protection, requiring a human to submit an answer or identifying when spambots try to submit data in a hidden CAPTCHA field (honeypot). Acquia recommends using some form of CAPTCHA on every form. MassiveHand Campaign Works™ also supports reCAPTCHA v2, which you’ll see as a field type after setting up the reCAPTCHA plugin.
- Checkbox Group: Enables a contact to select one or more options from a list, using check boxes. MassiveHand Campaign Works™ subscribers also use the Checkbox Group for a single option on opt-in forms to gain consent to use cookies and send marketing emails or other messages to the contact.NoteCheckbox Group works with Boolean and Select – Multiple field types but not Select fields.
- Date: Validates date fields in your default date format, and improves the end-user experience when completing the form. In a web browser on a laptop or desktop, the field shows selectors for month, day, and year. On mobile devices, a calendar displays.
- Date/time: Like the date field, but a selector will displays for time.
- Description area: A basic header field, most commonly used to give the form a visible title on the page. The Header field acts as the field name or label. The description area (in the Properties tab) is a free text editor where you can add a description of the form. You can also do this by adding text around the form on your page, but if you’re using the same form in several places adding the description on the form enables an efficient single change.
- Email: Requires a field containing an email address with the proper syntax –
name@domain.com. Acquia recommends having a required Email field on your forms, as email addresses are the default unique identifier. - File: Enables contacts to upload files with the form.
- Hidden: A field doesn’t display with the form. Users may add default values to save with the form for reporting or internal tagging purposes.
- HTML area: Enables marketers to add custom code into their forms.
- List – Country: Populates MassiveHand Campaign Works™’s default, non-editable country list. To use a custom list, use a Select field type and manually enter the countries you’d like to display in the list.
- Number: Validates that the entered values are digits. This field allows decimals and negatives, but no other non-numerical values (including commas). On mobile devices, the keyboard changes to a number pad when a contact selects this field to complete.
- Page break: Enables marketers to break up the form into multiple pages or field groupings.
- Password: Enables contacts to create a password. Use the field if the form is used to create an account and the results post to another form/system. The entered field value shouldn’t save, because the field saves in plain text on the contact record.
- Phone: Like the number field, but maps to the Phone field and validates numbers using international format. The validation requires a dialing code (for example, +1 for the United States or +44 for the United Kingdom).
- Radio Group: Gives contacts a a single-select list of options, with a radio button. This may also be called an option button group.
- Select: Displays a menu where a contact may choose one option. This field also allows multiple selections, which changes the display to a box with the options listed. On mobile devices, a single selection displays as a dialog box with radio buttons, while a multi-select menu displays in a dialog box with check boxes.
- Social Login: Connects a contact’s Twitter, Facebook, or LinkedIn profiles with the MassiveHand Campaign Works™ contact record.
- Text: A free-form text box with a limit of 255 characters. Common fields such as first name, last name, position/job title, city, etc. are often built as text fields.
- Textarea: A longer-form text field with a character limit of 65,535 characters.
- URL: Validates the entry must be a URL, including
https://orhttp://.
Field editor
Based on the selected field type, MassiveHand Campaign Works™ displays various tabs in the fields editor. The available tabs are:
General
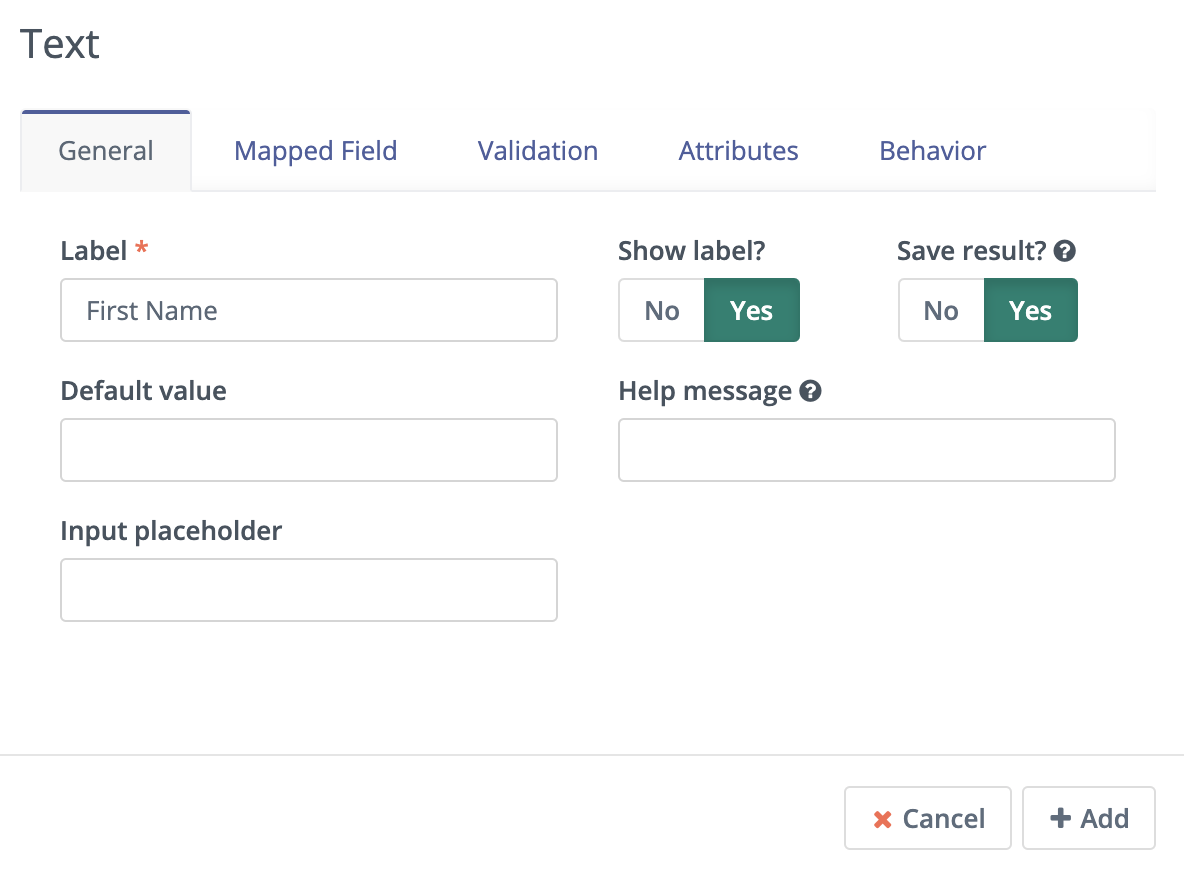
- Label: The title of your field – telling the contact what you’d like them to enter in the field. The label displays before the form field by default.
- Show label?: When set to No, the label doesn’t display on the form.
- Save result?: When set to No, MassiveHand Campaign Works™ doesn’t save the data entered in the list of form submission results. If you map the field to a contact field, MassiveHand Campaign Works™ still saves the data to the contact record.
- Default value: In case the contact doesn’t submit data for the field, you may enter a default value to submit with the form. This is useful for hidden fields and reporting.
- Help message: To add more detail on what you’d like a contact to enter, add a custom help message.
- Input placeholder: Adds text within the form field, acting as a label or help message. When used as a basic text field, (styling is from a “Fresh” landing page theme), the options display like this:
Mapped Field
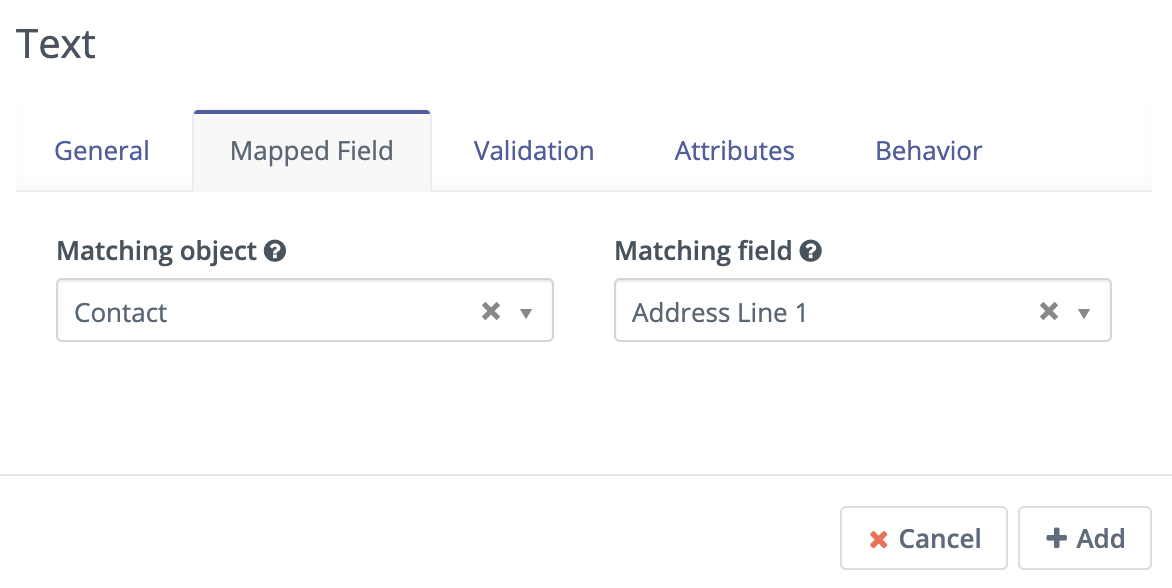
The Mapped Field maps the form field to where you want the data to save on a contact or company record. Without a field mapped here, the data won’t save to the contact or company record. The data type you choose for the form field should match the data type for the MassiveHand Campaign Works™ field. For example, a Date and time form field should map to a Date and time standard or custom field. Checkbox group form fields work well with Select – Multiple MassiveHand Campaign Works™ fields. Radio Group or Select form fields work well with Boolean, Select, or Select – Multiple MassiveHand Campaign Works™ fields.
Validation
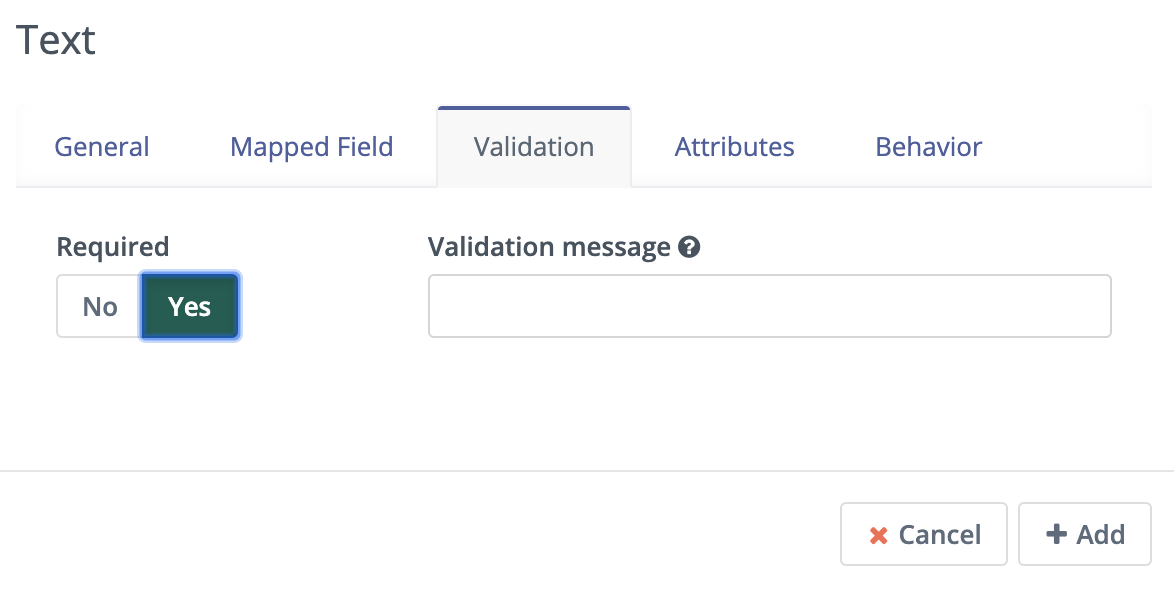
- Required: Determines if the form field must be populated on submission. MassiveHand Campaign Works™ won’t accept form submissions without data in the required fields. Labels for required fields will have an asterisk (
*) to indicate they’re required. - Validation message: A message which displays if a contact attempts to submit a form without data in a required field. MassiveHand Campaign Works™’s default message is
This is required.Enter your custom message in the box to change the display.
Properties
The Properties tab doesn’t display on all field types. Different field types have different properties options.
Captcha

- Captcha answer: To use the CAPTCHA field as a honeypot, leave the CAPTCHA answer field empty. This hides the field, and spambots will try to populate the field with data. MassiveHand Campaign Works™ recognizes if there’s data in a honeypot CAPTCHA field, and understands it can’t be a human submitting the form. To have human answer a basic question or statement, like
What is 2+2?orEnter "CAPTCHA", enter the expected response in the CAPTCHA answer box. In these cases,4orCAPTCHAwould be the answers. The field’s Label should be your question, or you may label the fieldCAPTCHAand use the input placeholder, depending on your preference for the form’s appearance. - Custom error message: If a human enters a wrong CAPTCHA answer, an error message displays on submission. MassiveHand Campaign Works™’s default error message is
The answer to "{label}" is incorrect. Please try again.You may enter custom message here instead.
Checkbox group, radio group, and select

Here, you enter the options a contact will select from.
- Use assigned contact/company field’s list choices: If you’ve mapped the form field to a MassiveHand Campaign Works™ field which has a pre-set option list (in the Custom Field setup), you may use those options and not recreate them on the form.
- Optionlist: If you’re not using the assigned options from a contact or a company field, configure the potential options here. The Label field controls how the option will display on the form. The Value is how the data will be stored on the contact record and in the database. The Label and Value often, but don’t always, match. As an example, if you’re using a checkbox field for GDPR opt-ins, your Label may say
Yes, I accept that I may receive email communications from this company.. Your Value could be aYesor1as a positive boolean value. - Empty Value (on Select only): This serves the same purpose as an Input Placeholder, which is available on most other field types. The Empty Value is not a default value, and MassiveHand Campaign Works™ won’t save the value to the contact record.
- Allow Multiple (on Select only): This option transforms the field from its default Select field type into a *Select – Multiple field type.
Description area

Use the Description Area field when there’s any information you’d like to display with the form. Often, users will add this kind of information on the webpage, landing page, or application instead of the form, but it’s an option in the form builder.
File

- Allowed file extensions: By default, MassiveHand Campaign Works™ accepts the following file types:
- Maximum size (MB): The maximum size MassiveHand Campaign Works™ allows for uploads is 100MB. You may reduce the file size to restrict user to uploads to smaller files.
- Public accessible link to download: When a contact uploads a file on a form, MassiveHand Campaign Works™ saves the file as a link. Select Yes to enable anyone to download the originally uploaded file by visiting the link. Select No restrict downloads to users logged into the MassiveHand Campaign Works™ instance.
HTML area
Add code you’d like to include in an HTML field here.
List – Country

- Empty Value: This serves the same purpose as an Input Placeholder, which is available on most other field types. The Empty Value is not a default value, and MassiveHand Campaign Works™ won’t save the value to the contact record.
- Allow Multiple: This option transforms the field from its default Select field type into a Select – Multiple field type.NoteMassiveHand Campaign Works™’s Country field is a predefined, non-editable list. To edit the list’s options, create a Select field and manually enter the options for your custom country list.
Page break

- Next page button label: This text displays on the button contacts click to move forward to the next page, or set of questions on the form. This isn’t a submit button and won’t save any data.
- Previous page button label: This may apply if you’re already on a 2nd (or more) page and would like to give contacts an option to go back to the previous page. It’s a button to move backward in the form, not a submit button.
Attributes
Attributes are CSS tags to change the styling of a particular form. If you set Render Style to No on the form, these attributes will be ignored.
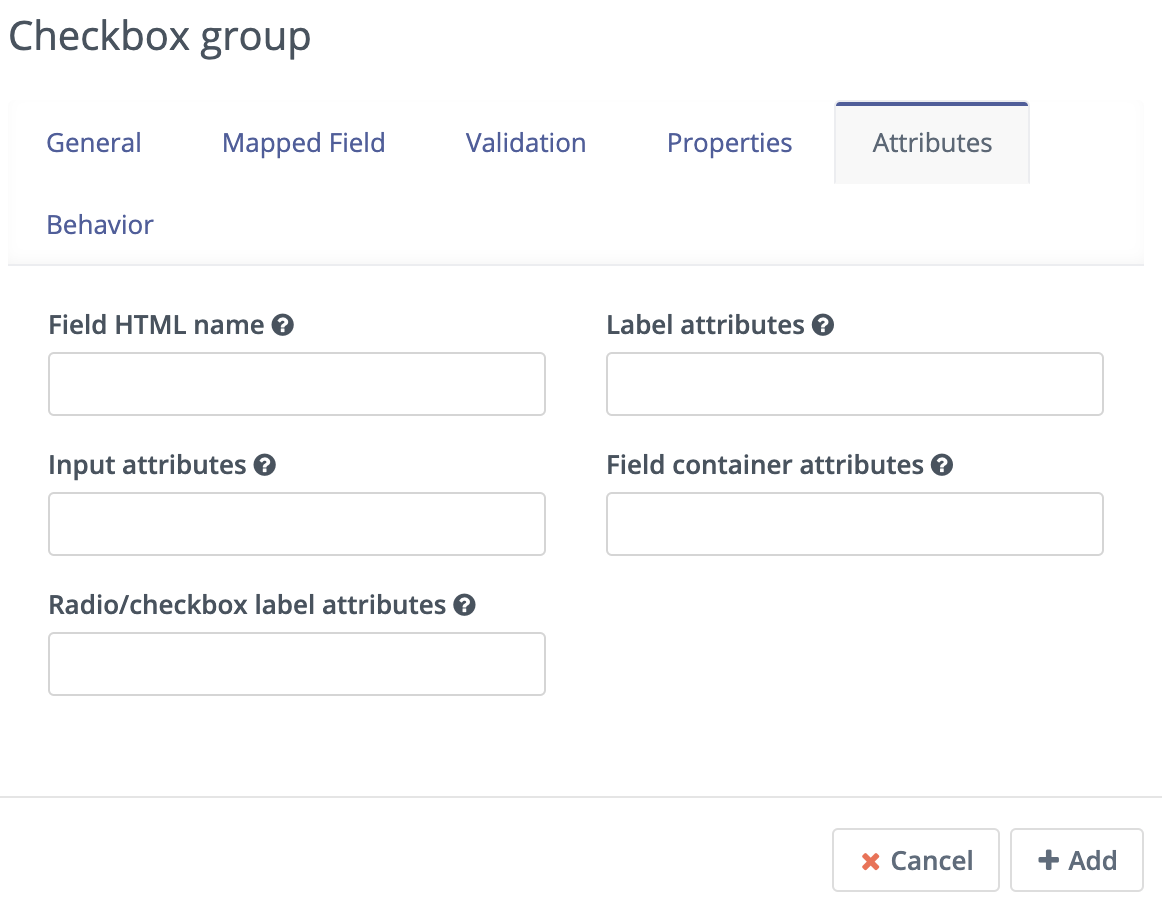
- Field HTML name: The machine name for the field. MassiveHand Campaign Works™ will populate this based on the Label, and is customizable if the label is long. Generally, you’ll reference the HTML name when you’re connecting MassiveHand Campaign Works™ forms to other forms or when you’re using the Manual Copy function to manually add the form to your page or application.
- Label attributes: Changes the way the label text appears. Use the format
style="attribute: descriptor"to change the style. For example, to change the label to red, usestyle="color: red"orstyle="color: #ff0000". - Input attributes: Changes the way any text inside the form field appears. This may apply to the input placeholder text, text entered by the person submitting the form, or the options for select fields when Allow Multiple is set to yes (including List – Country).
- Field container attributes: Changes the form field. You may want to change the size of the box, fill color, rounded edges, or any of several other properties of the actual field.
- Radio/checkbox label attributes: Where available, changes the way options on radio buttons or checkbox groups display, similar to the input attributes.
Behavior
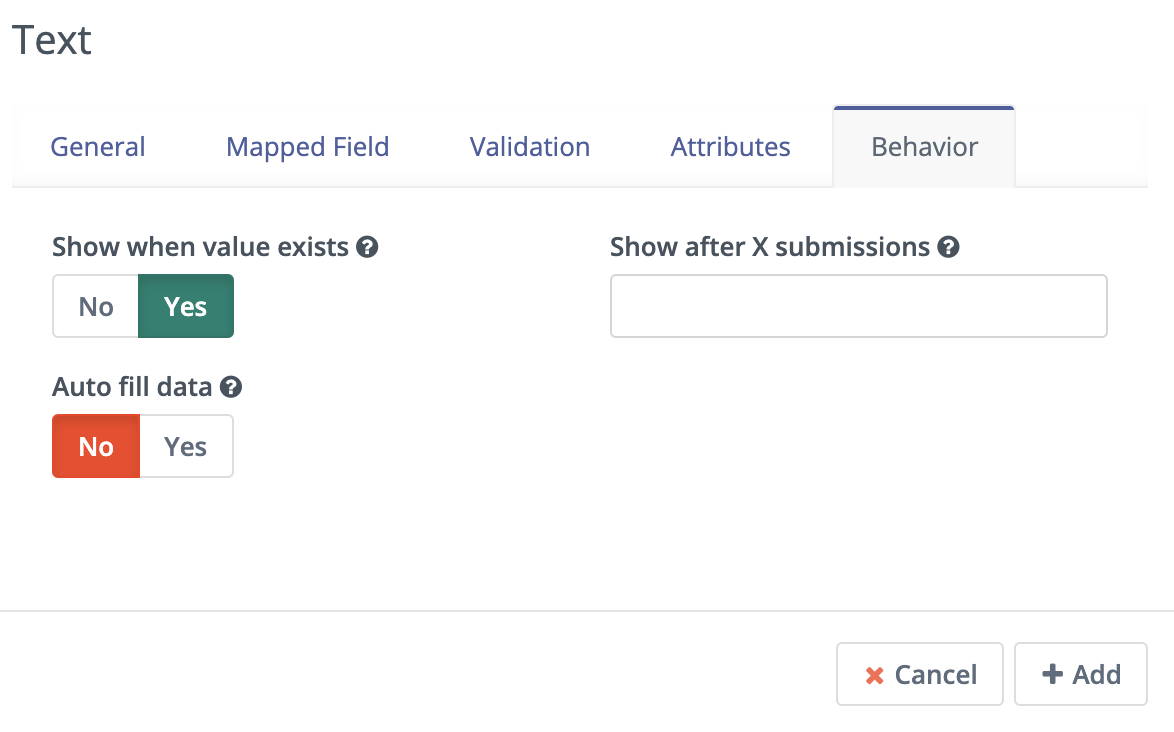
The Behavior tab helps marketers improve the experience for the contact completing the form. It also helps marketers implement progressive profiling, to gather more data from the contact which helps in optimized personalization.
- Show when value exists: If the contact is known and tracked and a value for the field exists on the contact’s record, MassiveHand Campaign Works™ can hide the field. Set this option to No to hide the field. Marketers may want to do hide the field so they’re not repeating the same question. Marketers may want to display the question to ensure the contact is entering the most current information. Acquia recommend always displaying the unique identifier (most commonly the email address).
- Show after X submissions: This is the key to progressive profiling. If you’re using the same form in several places on your website, you can change the fields the contact sees each time they see the form. Enter a value between
1and200. This field will hide the field until the contact submits the same form the stated number of times. When left undefined, the field will display every time the contact sees the form. The goal is to shorten the form. Use it with hiding fields when values exist. - Auto fill data: If the contact is known and tracked and a value for the field exists on the contact’s record, MassiveHand Campaign Works™ can pre-populate the data. Auto fill works with MassiveHand Campaign Works™ landing pages, and data won’t pre-populate when the form is placed anywhere else. Even if you’re hiding this field, you may want to turn auto fill on so the result saves with the form submission.
Field order
To change the order of the fields on your form:
- Click the field you’d like to move.
- Drag the field to the new location.
Form actions
You may want to have things happen after a contact submits a form. These may include communications with your contact, tracking, internal notification, or other lead management. The same the form actions available on Campaign forms are available on standalone forms. The actions available on both display with an asterisk *.
- Add to company’s score: If the contact who submitted the form is associated with a Company record in MassiveHand Campaign Works™, you may add points to the Company’s overall score. Company scoring in MassiveHand Campaign Works™ doesn’t aggregate points for all its associated contacts. Any actions you’d like to contribute to a company’s score must be explicitly set. Negative numbers are valid if you’d like to subtract from a company’s score based on a contact submitting the form. If the contact hasn’t been tracked and the form doesn’t include a field mapped to Company or Company Name (on the Company object), no points award to a Company.
- Adjust contact’s points: More in depth than the company score action, this action allows you to multiply or divide a contact’s score. Select the operator and the amount you’d like to change the points by (for example: add 10, subtract 5, multiply by 3, divide by 2). If the form is collecting information which doesn’t identify the contact, MassiveHand Campaign Works™ saves the points to the anonymous contact record. If that anonymous contact record converts to or merges with a known contact record based on some identifying event (form submission with the unique identifier or link click in a message), the points will stay with the contact.
- Modify contact’s segments: This action enables users to change a contact’s segment membership when they submit a form. Type in the name of the segment you’d like to add a contact to or remove a contact from. You may use both fields in one Action, and may include multiple segments in either or both fields. Dynamic segments based on filters update based on information on the contact record. That includes the data from the form submission, as long as the fields map to Contact or Company fields. Typically, you’ll want to use static segments here. An example of a time when you could remove someone from a dynamic segment is for an event registration. You may build a filter-based segment for your invitation campaign, but once a contact submits the registration form you want to remove them from the source segment so they’re removed from the invitation campaign.
- Modify contact’s tags: If you use tags for tracking, segmentation, and reporting, you may add or remove tags based on a form submission. If you’d like to add or remove a tag you’ve used before, select the tag from the list which displays when you click in the field. To find a tag, type the name to search and shorten the list. To adding a new tag, type the full tag name and press Enter on your keyboard to save the tag.
- Record UTM Tags: If the page your form is on has UTM tags, whether it’s a MassiveHand Campaign Works™ landing page or not, MassiveHand Campaign Works™ can record those UTM tags to the contact record. This is useful for reporting on where your new leads and form submissions are coming from.
- Remove contact from do not contact list: If a contact has unsubscribed and this form gives you permission to send them emails again, use this action to remove the Do Not Contact designation.
- Download an asset: Using this option triggers an asset download when the contact clicks the Submit button. If you use categories to organize your assets and want the contact to receive the most recent published asset from a certain category, choose that option, and then choose the category to download from. Or, choose a specific asset to downloaded. For more information on assets, see Assets.
- Post results to another form: Use this option to connect your MassiveHand Campaign Works™ form with some other form. You may have forms in other tools which you use for tracking and reporting. Or, you may have back end forms triggering software instance creation. Enter the URL where the form should post to, and email address(es) for anyone who should receive error notifications. If the form you’re posting to is behind a firewall, also enter the authorization header. If the field aliases (machine names) for any of the fields don’t match, enter the alias the other form uses for any fields on the MassiveHand Campaign Works™ form.
- Push contact to integration: Once a contact as submitted the form, you may want to push them to another piece of software you’re using for contact management (such as a CRM). Be sure the plugin you want to push contacts is configured and published, then select it here. The Salesforce plugin enables users to select a campaign and a campaign status, beyond a basic push to Salesforce.
- Send email to contact: To directly email the contact after they’ve submitted a form, use this option. Select Template email from the list, or click +New Email to build a new one. After you’ve selected an email, you can also pop open a new window to make edits or to preview the email.
- Send email to user: Select this option to email an internal user after a contact submits a form. This is limited to people who have been set up as MassiveHand Campaign Works™ users. Similar to the Send email to contact option, select the Template email you’d like to use or create a new one. Any tokens in the email will display the data from the contact, not the user.
- Send form results: This is most commonly used to send an internal notification when a contact has submitted a form. You may also use it to send a confirmation of the submission to the contact, with the data the contact entered. Make the subject line clear which form the submission is for, particularly if you have several forms with the results going to the same person or people. The Reply to contact option sets the
reply-toaddress on a notification email to the contact’s address, so if you click reply on the email your recipient will be the contact. If you have contact owners assigned in MassiveHand Campaign Works™, you can send the notification directly to the submitter’s owner. You may also decide to send the email directly to the contact. You may style the message section as you’d like. The tokens for the fields will populate for any fields which exist when you add this action. If you later make changes to the fields, come back to this action and re-enter the field tokens. To do that, click in the Message box where to place your cursor. Click the field name on the right side and MassiveHand Campaign Works™ inserts the token where your cursor is. If you’d like to use a Template email instead of the basic form results template, select one from the Import from an existing template box. Finally, add the addresses for the people you’d like to receive the form results. Unlike the Send email to user action, Send form results emails aren’t limited to MassiveHand Campaign Works™ users. You may send these to internal employees who aren’t users, 3rd parties, or to distribution lists.
Adding forms to pages

You can add form code to your application or webpage in several different ways.
Shortcodes
If you’re adding a form to a MassiveHand Campaign Works™ landing page or a Drupal, Joomla!, or WordPress page, you can use a shortcode. In each case, replace“ID#“ with the form’s ID number. You can find the ID in the forms list in the far right column, or if you’re on the form, it’s the number at the end of the URL. These options use JavaScript, and will keep the form up to date as you make changes.
- MassiveHand Campaign Works™ Landing Page:
{form= ID#} - Drupal 7.x:
{mauticform id =ID# width=300 px height=300 px}. Be sure to change the width and height to the appropriate sizes for the space you’d like the form to display.NoteThis short code doesn’t work for Drupal 8.x. Acquia recommends using the Automatic Copy option instead. - Joomla!:
{mauticform ID#} - WordPress:
[mautic type="form" id=ID#]
Automatic copy

The Automatic option keeps your forms updated wherever you use this code. If you make changes to the form in your MassiveHand Campaign Works™ instance, you don’t need to worry bout re-copying the code everywhere the form appears on your site. Features like autofill and progressive profiling will work only with the automatic copy options, not with manual copy. First, if you have a custom domain for your instance, be sure you’re logged in using the custom domain rather than subdomain.mautic.net.
Via JavaScript: Other than shortcodes, this is the recommended way to add forms to pages. Copy the line of code in the box and paste it into your website where you’d like the form to display.
Via iframe: While there may be cases where using an iframe is preferred for page load time or styling, iframes can be more difficult to manage. Be sure to adjust the width and height for the space you’d like the form to be in. Depending on the size of the screen your contact is using, they may still need to scroll within the iframe on your page to see all the fields. You may enter a custom error message to display in place of the form, in case the contact’s browser doesn’t support iframes. To do so, edit the text between the <p> and </p> tags before copying the code and pasting it on your website where the form should display.
Manual copy
The Manual copy option gives you a little bit more flexibility to extend forms with JavaScript snippets and custom styling. It’s more manual, and any changes made to the form won’t display on your page unless you re-copy and paste the HTML code. Be sure you’re logged into your instance using your custom domain, if you have one.
- Copy the JavaScript code in the top box and paste it into the head or body of your page. If you’ll have multiple MassiveHand Campaign Works™ forms on the same page, you add this once.
- Copy the HTML code in the bottom box and paste it where you’d like the form to display on your page.
- If you have Render Style set to Yes in the form editor, the styling for each field is in this code. If Render Style is No, styling code won’t be in and the form will use the default CSS for your page.