Focus items, also commonly known as pop-ups, modals, or lightboxes, are often used to present a specific marketing message to website visitors. In MassiveHand Campaign Works™, you can select from a variety of focus item styles, goals, and engagement techniques.
To create a new focus item, go to Channels > Focus Items and click +New.
General Options

- Name: Specify a name for the focus item.
- Website: Specify the page URL where your focus item should be displayed. MassiveHand Campaign Works™ displays a preview of the page in the focus item builder.
- Description (optional): Specify information about the focus item, such as the page it’ll be on, how it will engage, and its goal, to help other users understand the purpose of the focus item.
- Category: Select a group to organize your emails based on your goals, campaigns, and other categories. For more information, see Global Categories.
- Published: Set this toggle bar to Yes to publish a focus item. Unpublished focus items won’t be displayed on any pages, even if the code exists on a page.
- Publish at: Set the start date and time for which you’d like the focus item to be active. This helps control relevance and prevents users from needing to manually publish focus items at the right time, particularly if you’re building the focus item before it should be live.
- Unpublish at: Set the end date and time after which you’d like the focus item to be inactive. This helps control relevance and prevents users from needing to manually unpublish focus items at the right time, such as at the end of a marketing campaign.
- Google Analytics UTM Tags: MassiveHand Campaign Works™ supports UTM tagging in focus items, emails, and landing pages. Any UTM tags with values populated are automatically appended to the end of any links used in the focus item.
Builder
After you specify the general information for the focus item, click the Builder option in the top right corner. If you’ve specified a URL in the Website field on the details page, the system displays a preview. If you don’t, the website might block iframe previews. Hence, you must add the focus item to a development or staging environment (if available) to see the preview.
Note
The preview doesn’t appear until a style is selected.
You can create the focus item on the sidebar on the right, while the preview area lets you see what the focus item will actually look like on your website.
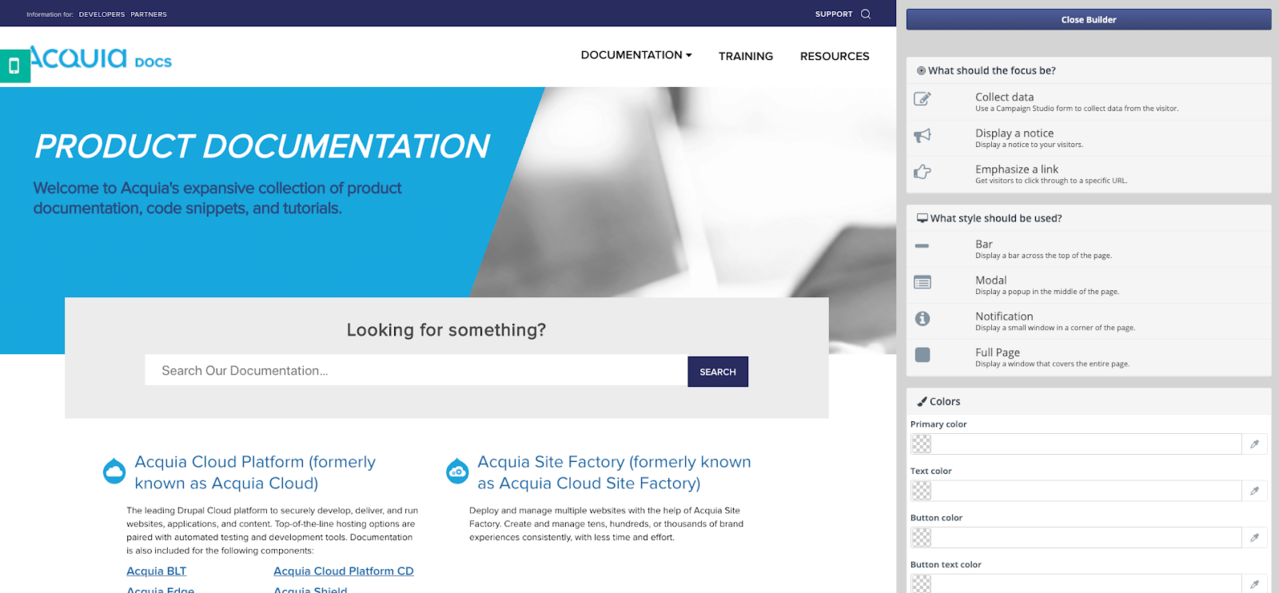
What should the focus be?
Types of focus items
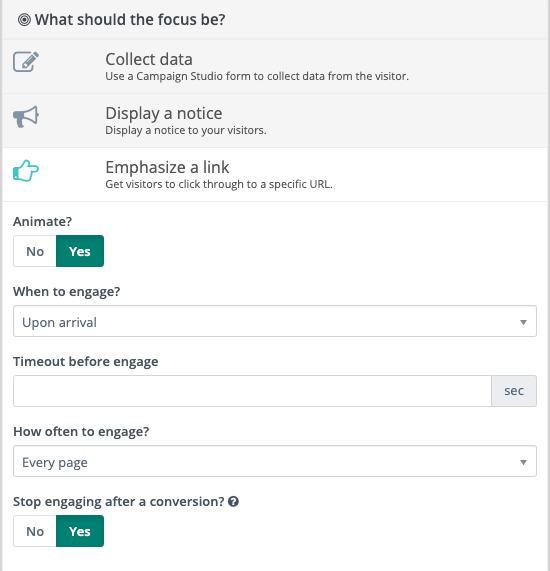
- Collect Data: This option presents a form within the focus item, enabling you to gather more information about your website visitors. A successful conversion on this type of focus item is a form submission.
- Display a notice: This option enables you to present a message to your website visitors. There is no conversion for this focus item type.
- Emphasize a link: This option enables you to drive website visitors to a particular page. That page may be for a specific event, offer, or something important to your marketing strategy. A successful conversion on this type of focus item is a link click.
Engagement options
Each of the three types of focus items has the same options for how and when it should appear.
- Animate?: Set this toggle bar to Yes to ensure that a slide-in animation appears along with the focus item. Alternatively, set this to No to ensure that only the focus item appears.
- When to engage?: Select one of the following options that determines when a contact can view the focus item.
- Upon arrival: When a web visitor lands on the page
- After slightly scrolling down: When a web visitor moves down the page a little bit
- After scrolling to middle: When a web visitor scrolls down the page and reacheds halfway down the page
- After scrolling to bottom: When a web visitor scrolls all the way to the bottom of the webpage
- Visitor intends to leave: When a web visitor’s cursor crosses over the address bar, from the page to the tabs (either to close the tab or window or move to a new tab)
- Timeout before engage: Set the delay (in seconds) after reaching the option selected in When to engage. For example, if you set When to engage? to Upon arrival and Timeout before engage to 2 seconds, the focus item appears two seconds after the visitor arrives on the page.
- How often to engage?: Set the frequency with which MassiveHand Campaign Works™ displays the focus item on the site. The available options are:
- Every page
- Once per session
- Every 2 minutes
- Every 15 minutes
- Once per hour
- Once per day
- Stop engaging after a conversion? (only for Collect Data and Emphasize a Link type of focus items): Set this toggle bar to Yes to stop displaying the focus item after a form submission (for the Collect Data type) or link click (for the Emphasize a Link type). This option doesn’t appear on the Display a notice type as there is no conversion point.
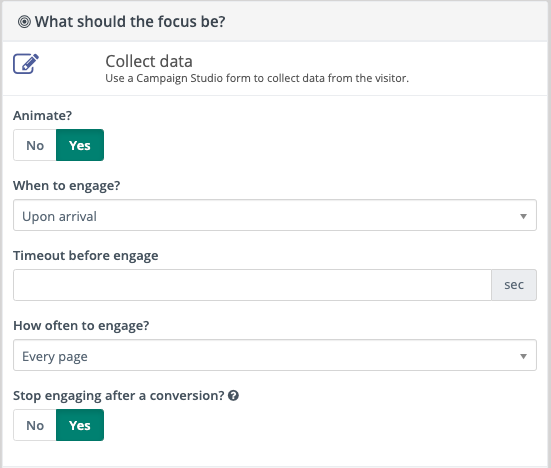
What style should be used?
Focus items can have any one of the four different appearances, each with unique configuration options.
Bar
The Bar style is a line across the top or bottom of the page that includes the content of your focus item.
- Allow hide?: Set this toggle bar to Yes to ensure that website visitors view a clickable arrow on the right side of the focus item bar. Once clicked, the bar shrinks to hide the content, but the arrow will be visible. One can click the arrow to re-open the bar. If set to No, the bar can’t be hidden.
- Push page down?: Set this toggle bar to Yes to push the content of the page down to below the bar. If set to No, the bar covers the content on the top of the page.
- Make sticky?: Set this toggle bar to Yes to let the bar appear at the top of the page even as the visitor scrolls down. If set to No, the bar is visible at the top of the page when the visitor scrolls all the way to the top.
- Placement: Select this option to ensure that the focus item bar appears at either the top or bottom of the page.NoteIf you select bottom, the options above are reversed. For example, if the Placement is set to bottom and Push page down? is set to Yes, the bar pushes the bottom content of the page up above the bar. If Push page down? is set to No, the bar covers the content at the very bottom of the page.
- Size: Specify the thickness of the bar and font size. The two options are large (50px height and 17pt font) and regular (30px height and 14pt font).
Modal
The Modal style is the most commonly used style and is often referred to as a pop-up, lightbox.
The modal is a small box that appears aligned horizontally centered on the page. The content of the main page is darkened when the focus item is active, to draw attention (focus) to the pop-up.
Visitors can close this focus item type with the X button in the top right corner of the modal.
- Placement: Select if you’d like the modal to appear at the top of the page, in the middle, or at the bottom of the page.
Notification
The Notification style is a small box and can be referred to as a pop-up.
Unlike the modal, the positioning is in one of the four corners of the page and the main page content is not darkened behind the focus item.
Visitors can close this focus item type with the X button in the top right corner of the notification.
- Placement: Select if you’d like the notification to appear in the top left, top right, bottom left, or bottom right of the page.
Full Page
This focus item type completely takes over the page, hiding the rest of the page content until the visitor clicks the X button in the top right corner of the focus item.
There are no additional configuration options for the full page focus item.
Colors
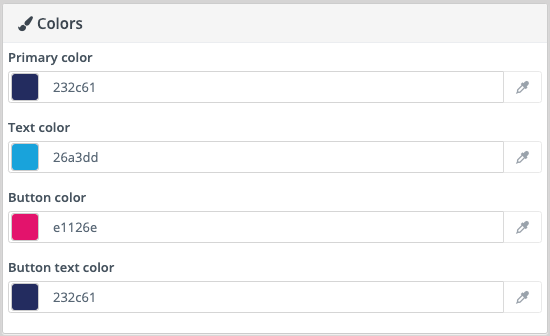
There are four color options on focus items that you use to customize the look of the item. For all four options, you may use the color picker or enter a hex code.
- Primary color:
- For the Bar style, the primary color is the background color of the bar.
- For the Modal, Notification, and Full Page styles, the primary color provides an outline around the focus item with a thicker line on top than on the other three sides.
- Text color: The color of the headline text entered in the Content section of the focus item editor.
- Button color: The background color for the button on the Collect Data or Emphasize a Link focus item types. This option is not available for the Display a notice focus item type.
- Button text color: The color for the button text on the Collect Data or Emphasize a Link focus item types. This option is not available for the Display a notice focus item type.
Content
There are three content editing modes to choose from to customize the focus item.
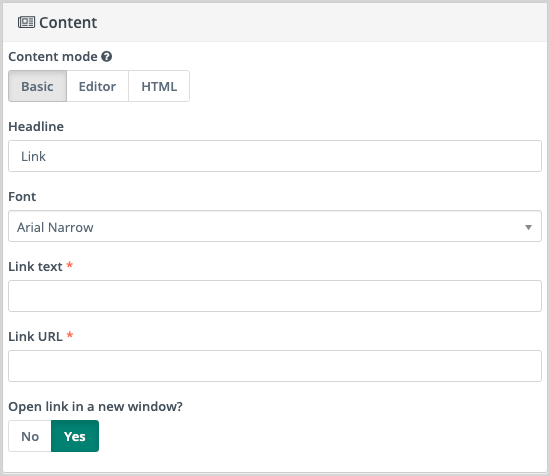
Basic
This editor mode offers a few fields, depending on the focus item type, and automatically enters the content in the focus item.
- Headline: Specify the main text to provide with the focus item. Draw your visitors attention with this text.
- Tagline (only for Emphasize a Link type): Specify a second line of text giving your visitors a reason to click the link. This field is optional.
- Font: Select an option from one of the several available fonts to use for the text display. The font list is not customizable.
- Select the form to insert (only for Collect Data type): Select the form, built in MassiveHand Campaign Works™, that should be used for the focus item. For styling and formatting reasons, you may want to build a form specifically for the focus item, adding styling to the Attributes tab on the form fields, even if a similar form appears in other locations on your site.
- Link text (only for Emphasize a Link type): Specify the text that should appear on the focus item’s button.
- Link URL (only for Emphasize a Link type): Specify the URL where you’d like to drive visitors to, with the focus item.
- Open link in a new window? (only for Emphasize a Link type): Set this toggle bar to Yes to open a new tab for the destination page when visitors click the focus item’s button. If set to No, the target page opens in the current tab.
Editor
This editor mode uses the same WYSIWYG editor used for global tokens, dynamic web content, dynamic content in emails, and the text slot in the legacy email builder.
HTML
This editor mode presents a blank field to write or paste the HTML code for a fully customized focus item.
Note
If you switch content editing modes, ensure that you clear the content from the previous editing mode. If you don’t do so, MassiveHand Campaign Works™ may not display the final intended content.
Using focus items
Once you’ve built your focus item content and the same is ready to go on your site, set the Published toggle bar to Yes or set a publish at date and time and click Save and Close. If you’re not ready to publish yet, you can add the code to your site and publish the focus item later. Unpublished focus items don’t appear on any page, even if the code for the focus item exists on a page.
On a website
Note
Adding a focus item to your website may require assistance from other members of your organization, such as your web development team.
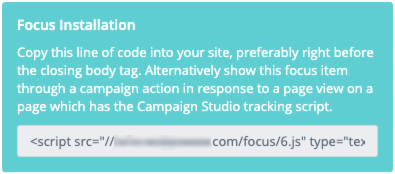
On the focus item detail page, you’ll see a box in the top right corner. Copy the code snippet and paste it onto your page before the closing body tag.
Note
You must specify your website’s domain in the instance’s CORS settings for the focus item to appear. To check this setting or to add the domain, go to Settings > Configuration > System Settings > CORS Settings, set Restrict Domains to Yes, and specify your site’s domain. Alternatively, set Restrict Domains to No and don’t specify your domain.
This is to ensure that other websites can’t add your focus item, which might result in spam form submissions or website traffic.
In a campaign
You may also display the focus item without pasting the code on your site. Within a campaign, add a decision for Visits a Page, select the action option: Show Focus Item, choose the focus item you’d like to display once a visitor lands on the page specified in the decision.
Warning
Acquia is aware of an issue where the Show Focus Item campaign action doesn’t work properly. If you would like to use this action, contact Acquia Support for prioritization.
On a landing page
You can add a focus item to a MassiveHand Campaign Works™ landing page. In any text block or code mode block, use the shortcode {form=ID#}, replacing ID# with the ID number of the focus item you’d like to display.
In dynamic web content
To add a focus item to dynamic web content, you’ll need to use the {form=ID#} shortcode and replace ID# with the ID number of the focus item you’d like to display.
Testing focus items
MassiveHand Campaign Works™ displays the preview of the focus item when you start building the focus item. The preview depicts the look and feel of the focus item. You can add the focus item code to your page or site in a dev or staging environment to test the feature thoroughly.
Here’s a checklist of items to consider testing:
- Focus item appears when it’s expected to appear.
- Focus item appears with the right content. There might be issues if you use multiple content editing modes.
- Focus item stops engaging after a conversion.
- Form appears correctly on the page and you can submit the form successfully.
- The link appears at the right place.
To verify if a focus item is displayed properly from a campaign action or if it stops engaging after a conversion, you must be tracked as a known contact. The first steps for both tests are the same:
- Create a form in MassiveHand Campaign Works™. Email address is the only necessary field.
- Add the form to a MassiveHand Campaign Works™ landing page or your website.
- Open the page where you’ve added the form in an incognito window or separate browser from where you’re logged into MassiveHand Campaign Works™. As page hit activity isn’t tracked in browsers where a user is logged in, this step is critical to ensure that you’re tracked properly.
- Keep that browser window open to continue testing.
To test the campaign action, add your contact to the campaign you’d like to test.
- Ensure that if there are conditions in the campaign prior to the Show Focus Item action, the contact record reflects the proper values for such conditions to lead to the focus item action.
- Stay in the incognito window for any page hits or other actions you’ll need to perform to go down the proper yes/no paths to reach the focus item action.
- Once you’ve made the decision to visit a page that comes immediately before the focus item action, visit a page tracked with your MassiveHand Campaign Works™ tracking code. If the decision specifies a particular landing page or URL(s), visit the specific page.
- The focus item appears, if the configuration is done correctly.
To test if a focus item stops after a conversion, navigate to a page where the focus item is expected to display. Use the incognito window where you’ve identified yourself using the form.
- Depending on the selected type, either click the link or submit the form on the focus item to complete a conversion.
- Navigate away from the page or go to a different page where the focus item is expected to appear.
- The focus item shouldn’t appear.
Measuring success
For focus items where you select the type as Emphasize a Link, MassiveHand Campaign Works™ displays the link on the focus item detail page. You can click the number in the Unique Clicks column to view the list of contacts who have clicked the link.
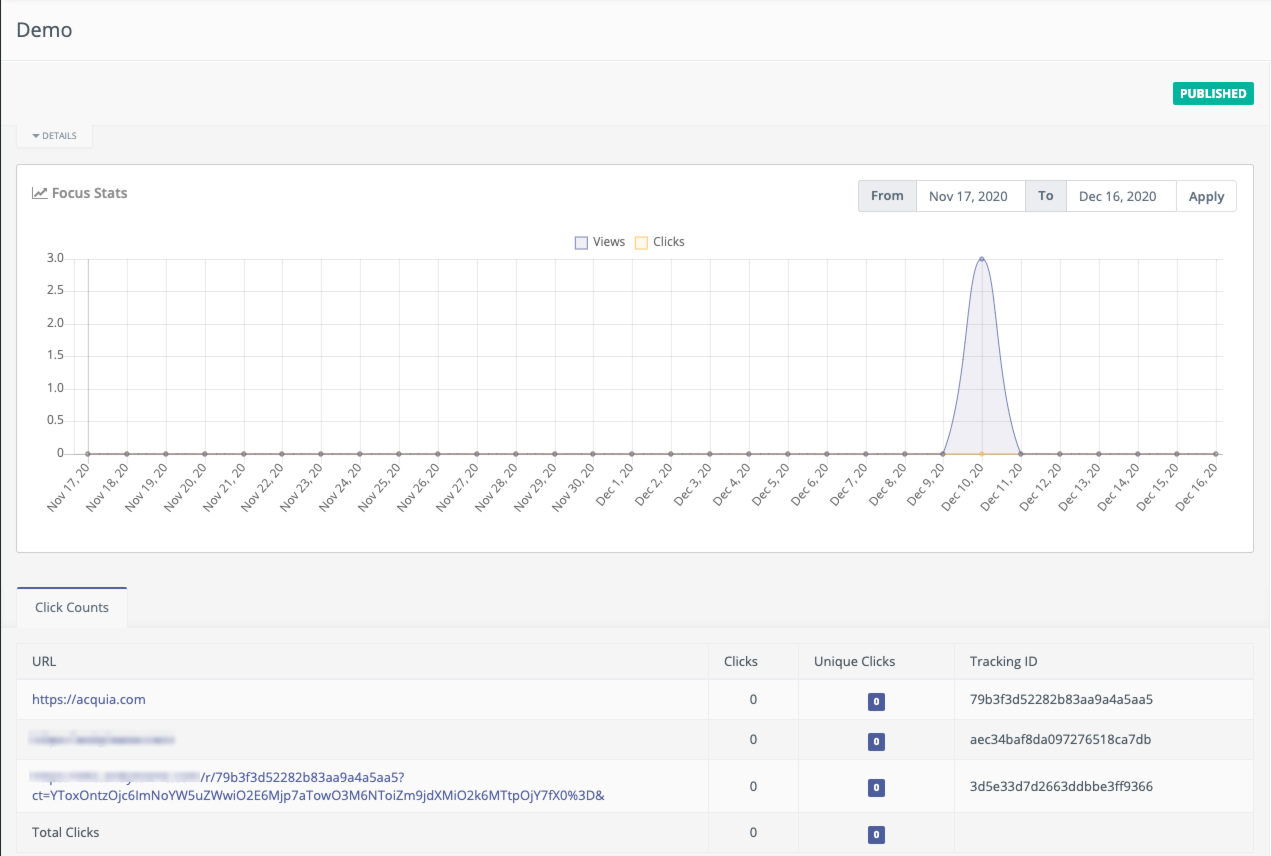
If you change the link in the focus item, MassiveHand Campaign Works™ lists all the links. Hence, you can view the links that were clicked from the focus item.
Additionally, UTM tags on focus items applies to both link tracking and form submissions. For focus items used to collect data, Acquia recommends using a form submit action to record UTM tags.